I really enjoyed the last pipe I restored, so I once again searched Ebay for pipes that were worse for the wear, and stumbled on another of my favorite styles, the Cavalier! The pipe I bought was missing the bottom cap, but at least still had the threads for it. The stem was oxidized and the bowl had very heavy cake inside. Luckily, the briar was in great shape and the grain on it at least at first glance was very pretty!
I started off my reaming the inside of the bowl to get rid of the ridiculously thick cake, which was surprisingly easy and revealed that the pipe was in really good shape!
Inspecting the briar more closely, I found no holes or voids that were filled at any point. It really seems that this pipe was well made and properly used, but I imagine the loss of the foot cap (either it broke or was lost) spelled the end of it's useful life for the previous owner. The process for re-finishing the briar was very straightforward, I used some 300 grit sandpaper to remove any grime and old finish, and then sanded to 600 grit for a really smooth surface. I applied a couple thin coats of amber shellac to the briar, which really highlighted the beautiful grain of this piece of wood. I decided not to dye it at all, as the natural briar color with shellac was plenty good-looking. In fact the grain on this particular piece of briar was stunning!
To make the foot cap, I used the remaining piece of horn I had from the last pipe I restored, and fashioned it into a simple cylinder. I drilled the hole and tapped it, which allowed it to very easily screw onto the existing threads coming out of the shank.
I polished the stem with progressively finer sandpaper, followed by a quick rub-down with Yorkshire Grit, and it came out looking fantastic! I wasn't able to use my lathe to create the bottom cap and so had to use my drill press. In the future I may redo the cap but for now the pipe looks great and is usable.
This is the conclusion of my series of posts documenting the restoration of my BMW R65. For the previous post in this series, click here.
This post is a conclusion for this project and a discussion of why I've decided to end this project now rather than to sink more time and money into it. This project has been a lot of fun and a huge learning experience but the knowledge I've gained has made me realize I went about some things in ways that weren't proper for the project in general. I'll discuss that here a little bit.
For starters, I have decided to keep the engine that I bought for the bike. It's a 1978 R100RS engine, and I see some potential to use it for another project later on or to fully rebuild as a functional display piece. I did some work on it during this project, including replacing the starter motor, voltage reducer, and updating the air intake. Some of the older electronics like the diodes will ne replacing, but modern reproductions are readily available and I will update that once I have a chance to rebuild the engine in the future.
One of the major factors in deciding to stop this project is damage to the frame that was sustained before I purchased it. I was initially under the impression that only the forks had been damaged when purchasing the frame, but it turns the steering column was also damaged and misaligned, which after having experience riding other motorcycles made me realize that it wouldn't be very safe to ride if I followed through with the full restoration.
Finally, there were just a number of other shortcuts I took that in hindsight were shortsighted. I cheaped out on the throttle body, handlebars, some components of the ignition system, and in the end didn't want to spend more money to correct those mistakes.
I've since sold nearly all the parts for the bike and luckily recouped the majority of my expenses. That's the great thing about vintage vehicles, people are always looking for parts!
I hope to have a similar project in the future with a more complete vintage BMW Boxer, and to rebuild the engine I have when time and funds allow. Thanks to everyone who followed along with these posts, and look out for the other stuff I'm working on!
A while back, my next-door neighbor had an ailing Nordic Maple cut down, and I was lucky enough to be able to grab some small pieces of wood as well as a respectably-sized slab from it! It appeared to have some nice spalting, so I thought it would make a fantastic bedside table.
Wet & moldy, but gorgeous!
I brought the slab inside and allowed it to dry for a few months before trying to start processing it. Those of you who read my previous post about my endgrain slab coffee table may remember that slabs of wood dry considerably faster through the endgrain than the long grain, so cookie slabs dry upwards of 10x faster than normal slabs. After 3 months, I used a circle cutting jig with my router to cut the table round. The slab was thicker than I could cut with the router bit I had, so I had to use a jigsaw to cut through the thicker parts afterwards.
With so much more material having been removed, I decided to weigh the slab and track any further weight loss before moving on to the next steps. My plan was to fill the large crack and other negative space with epoxy, and I needed the wood to be really dry before I could pour the epoxy.
About 3 weeks of stable weight was satisfactory for me, so I was ready to move to the next steps. I wanted to make sure I had at least one flat surface to make the epoxy casting process as smooth as possible, so I brought the slab to my buddy Ben at Ply Ply Furniture, who used his CNC table to flatten both sides for me.
I constructed a mold for the slab using terrace board and melamine coated OBD. I used packaging tape to cover the melamine to prevent the epoxy from sticking and caulked the seams of the terrace board to seal it up. I tinted the epoxy using lampblack, which doesn't contain mica (shimmery effect) and gives a great flat black look. The pouring process was relatively simple, though after the initial pour I did have to nurse a few small leaks over the course of a few hours as the epoxy cured.
After a week I unmolded the slab and was really pleased with how it turned out, despite the mess and headache with the casting process. I saw it as a great learning experience in any case. Some sources say this slow-cure epoxy needs several weeks to reach peak hardness, so I let it sit around for a few more weeks before taking it back to Ben for one final flattening.
At this point the table just needed sanding to smooth out both faces and the sides, and the legs to be attached. A few hours with an orbital sander did the job, and my usual urethane oil varnish really made the grain look great. I had a few hairpin-style table legs left over from another project, so I decided they'd be great to use for this. I drilled holes for M10-1.5 threaded inserts, which I figured would allow me to easily swap out the hairpin legs for something else later on if I decide I wanted to.
I'm incredibly happy with how this turned out! I'm including several photos to show off the finish as well as the grain of the wood. I found that some very small bubbles are still present on the surface of the epoxy, but since this will be a practical piece of furniture, I'm content to leave them as they are. Removing all the bubbles would have been a tremendous effort that I think ultimately wouldn't have been worth it.
This post is a blast-to-the-past for an event I participated in during my junior and senior years of high school. The Quick and Dirty Boat Building Competition (QDBBC) was a staple of the Seattle Maritime Festival in the late 2000s/early 2010s though unfortunately it appears as though this event no longer takes place during the festival, with the last promotional materials available online from 2012.
In the last years of high school, I was a member of our school's Materials Science Club. We decided in 2009 to enter that year's QDBBC as a 3-person team. The basic idea of the competition was to build a seaworthy boat within 6 hours on a materials budget of $100 and subsequently race the boat against the other competitors. All teams were allowed an additional $100 to test-build their boat before the competition to make sure the designs were feasible.
We decided early in the process to draw inspiration from racing shells, specifically their long and narrow design targeted at higher top speed over maneuverability. With the three of us seated along the length of the boat, we'd each be able to use 2 "oars" to propel ourselves. Here is a CAD model I created at the time as a draft of the general design:
After digging through some old photos, I surprisingly found a scanned image of the receipts from when we purchased our materials. For those of you reading this in 2023, it may seem impossible to buy all these materials for under $100, but things were way different in 2009! The plywood sheet was made into the body of the boat, the PVC pipe was crafted into pontoons and oars, and the 2x4s were primarily used for structural support.
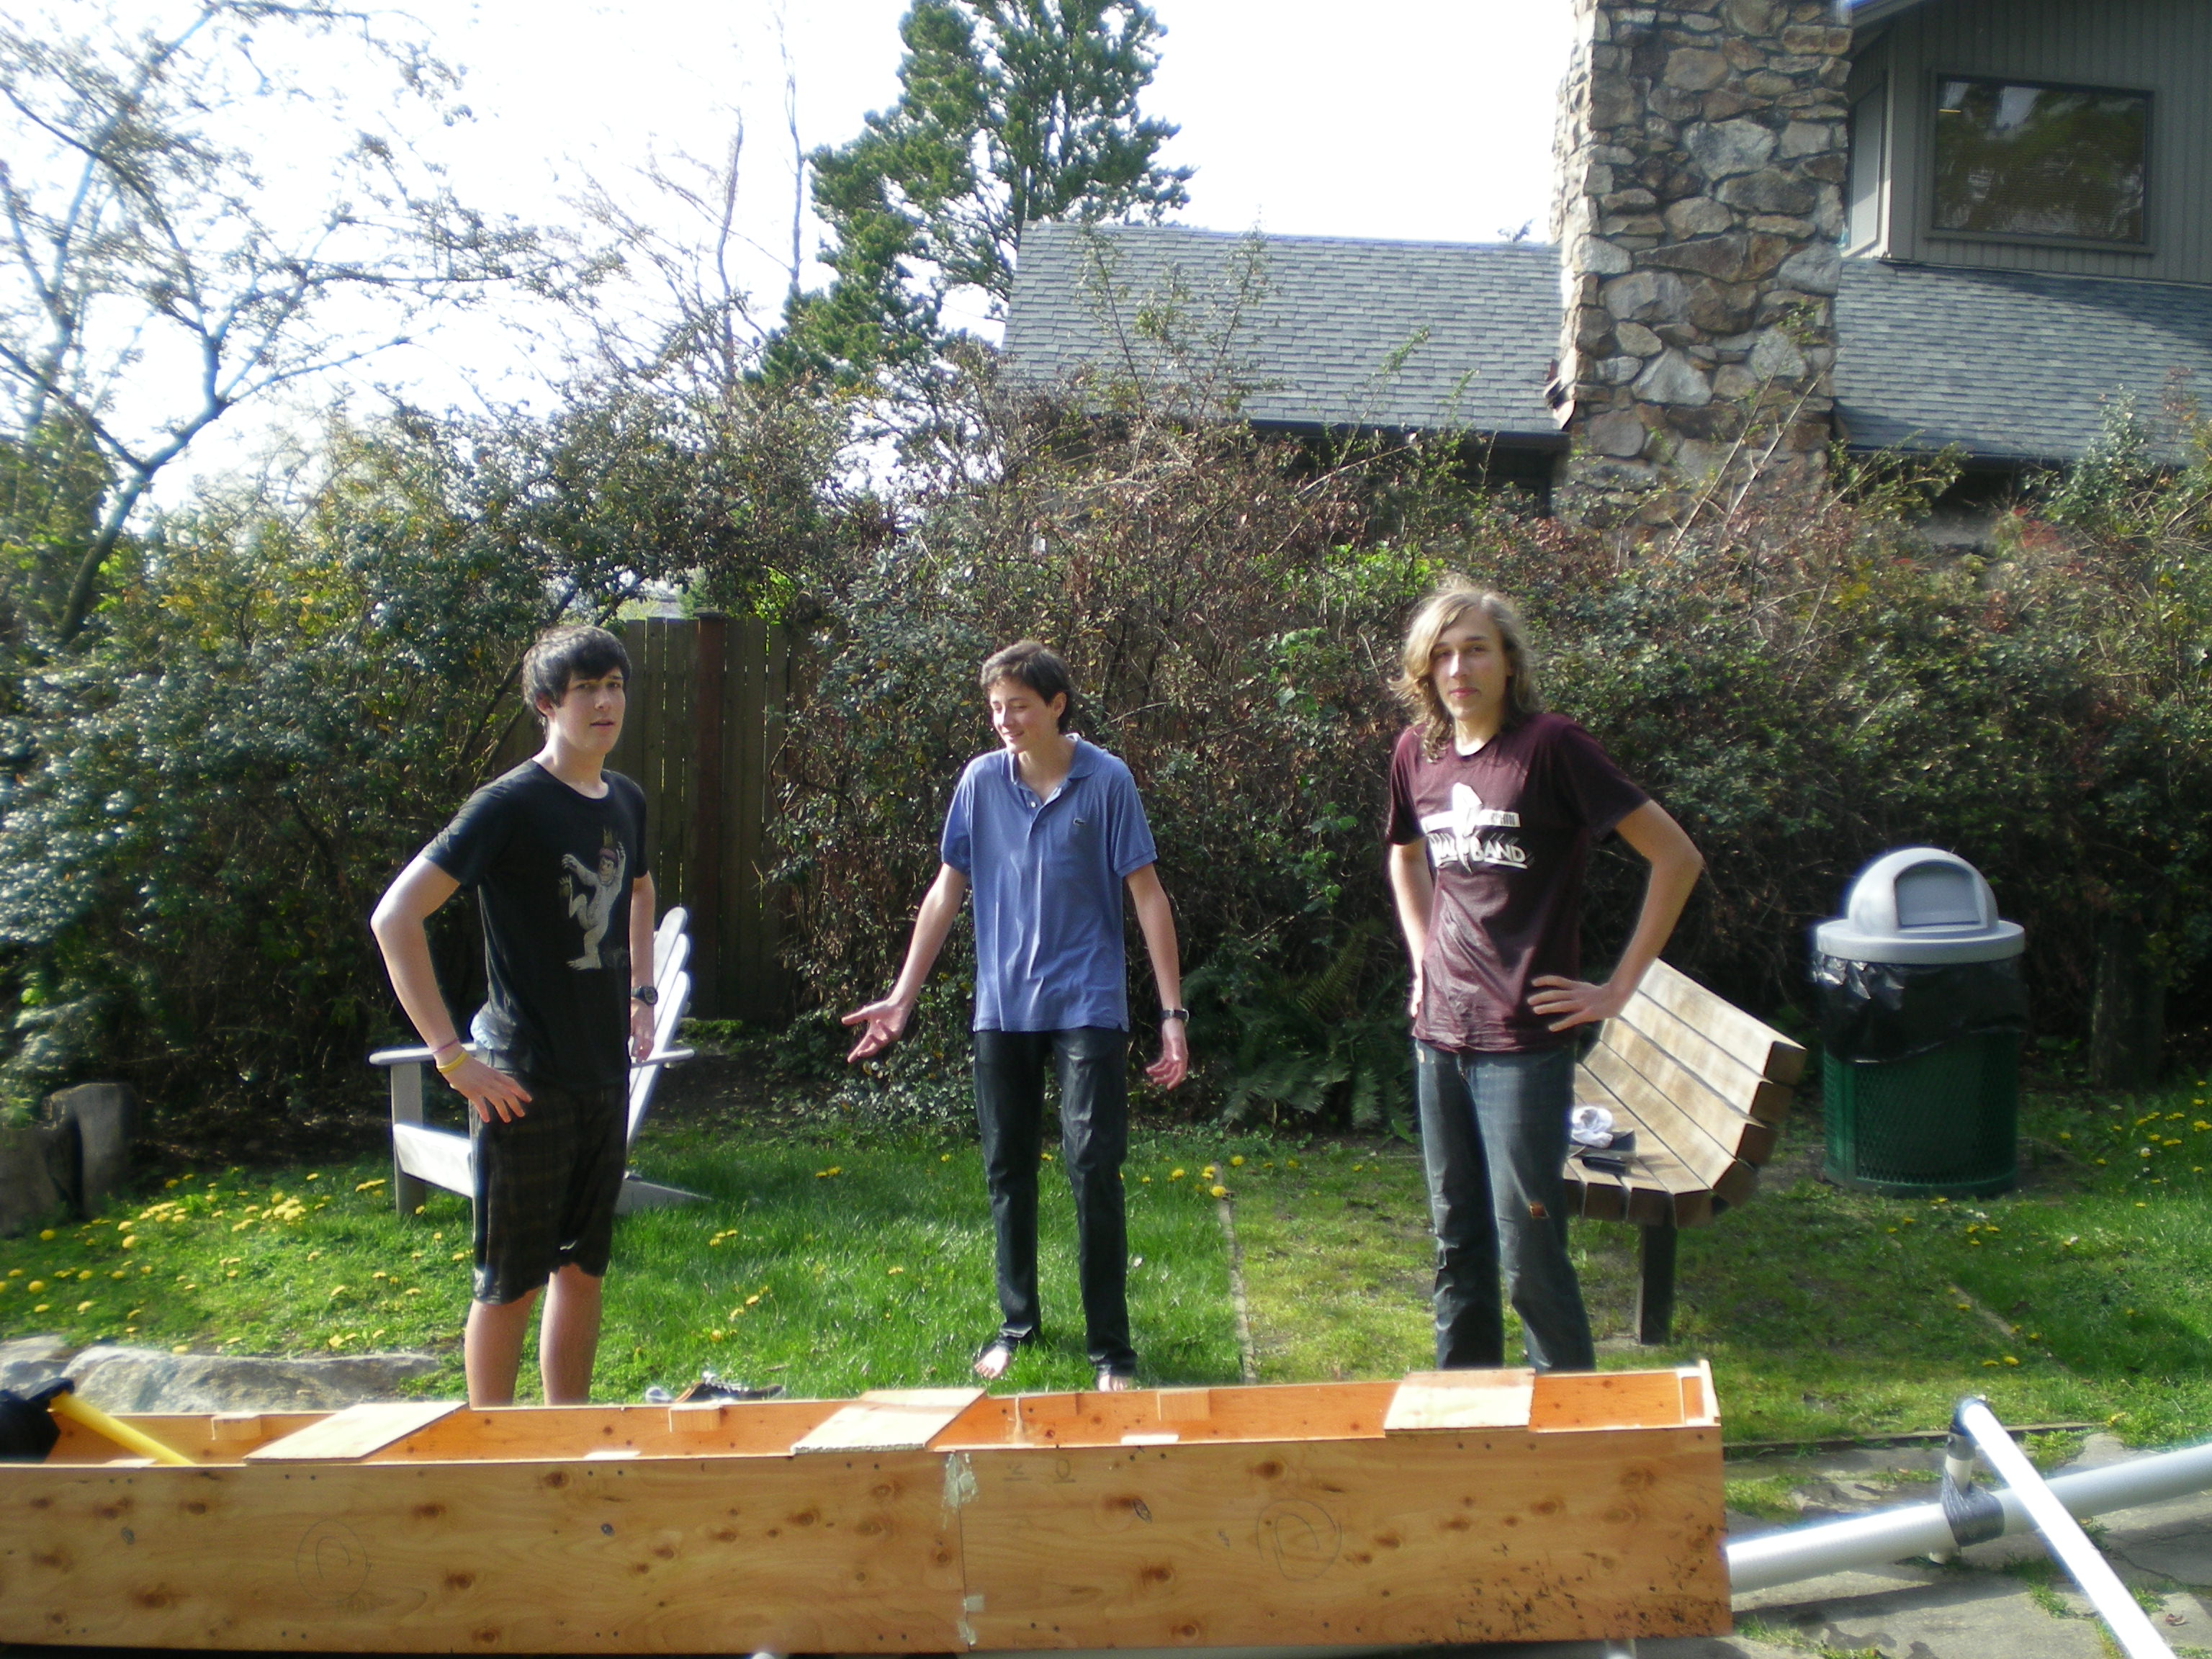
We constructed our test boat at one of our team member's houses because of the proximity to Lake Washington, where we planned to make our maiden voyage. Surprisingly, we documented the construction quite thoroughly with tons of photos and some videos from that day, from which I'll share a selection below. I'll post them chronologically, in an effort to make the assembly process easier to visualize. Click on any of the photos to see a full-size version!
The changes we made between the first CAD prototype and this test run are pretty subtle, with the biggest change being from a blunt bow to a pointed one. The cheap lumber we used necessitated a lot of expanding foam to fill the gaps, but we were still well under budget. At the end of construction, we were very eager to get into the water! Luckily it was a reasonably warm spring day, because things didn't quite go as planned (see video below)...
After a dip in the lake, we realized that our pontoons were not as structurally sound as we had hoped. As is hopefully visible in the photo above of the pontoons, the PVC pipe was screwed onto the hull from the top, meaning that only 6 drywall screws were carrying our combined weight when in the water. We learned our lesson, and later revised our design to prevent this failure from happening again.
The following week, we modified the pontoon cross-beams to pass through the hull rather than sit on top, and kept our small pieces of 2x4 as supports. We decided to grab a quick lunch before making a second attempt in the water. This time around, we were equipped with life preservers and only had two of us out on the boat. Additionally, one of our team members took an inflatable boat alongside us in case of emergency. It goes without saying that this test was far more successful than the first!
We felt confident at this point that we were ready for the competition. When the big day finally came, the construction process went incredibly smoothly, thanks in no small part to the experience gained from the trial run. The competition was held at the Bell Harbor Marina on the Seattle waterfront, and the weather was as good as we could've hoped. One of fellow Materials Science Club members designed a team flag for us, which we proudly displayed during the assembly as well as during the race!
After a busy 6 hours, we were ready to take to the water. A trailer was available to haul our boat down to the docks, and with only a bit of struggle, we managed to get her floating. The race consisted of 3 heats with 3 boats each, the winners of each heat moving on to the final heat. We won our first heat, and placed third in the final. One of our team members compiled the footage of the race into a short video:
During the award ceremony following the race, we were also given the award for "Best Student Team", though at the time we were under the impression that we were the only student team participating! We took it as a win, and were happy with the results. This was one of the most memorable experiences of my high school years, and I'm very happy to be able to share it here! I hope you all enjoyed reading about it as much as I enjoyed writing it.
I try as often as possible to make Christmas gifts for my family rather than buying things, and this year I decided that a great gift for my brother would be a wooden chess board. He has been studying chess more in recent years, and thought he would enjoy having a nice board to play on.
I didn't take any photos of my raw materials, but as you can imagine, I chose the usual maple & walnut combo for the white and black (brown) squares on the board. I cut them to the standard USCF width of 2.25" and glued them all together. When dry, I cut 2.25" strips from the striped board and alternated layers on the next glue-up to achieve the checkered pattern.
At this stage, I glued on the first border around the edge of the board, a thin strip of walnut. This was just an aesthetic choice to provide some more contrast on the edges. To add some thickness to the board, I used some spare pieces of maple to create a border around the bottom. I figured in addition to adding some heft to the board, this would also protect against any warping should it be subjected to higher or lower humidity.
Nearing completion, I took the board over to my brother-in-law who has a nice drum sander to flatten the top of the board and remove any irregularities. Seeing everything slowly come together was very encouraging! The final steps were to trim the edges fully flush/square and to add the final trim on the outer edge of the board.
Some years ago, I found a beautiful piece of figured maple in a "pay-per-pound" scrap lumber pile, and never did anything with it until now. I cut it into 1/4" strips and mitered the ends to the right length to line up at the corners of the board. This part was by far the most tricky as far as measuring and aligning, but the final product looks really great with no end-grain exposed.
With the assembly complete, I used my orbital sander to sand progressively to 600 grit which left a very smooth surface on the top. I only sanded the bottom to 220 since it's not visible during use and will likely wear much faster than the top anyway. Two coats of boiled linseed oil (BLO) really made the contrast between the maple and walnut pop, and brought out the figuring in the maple strips around the edges! I'm incredibly happy with the end result, and my brother really loved it too.
I hope everyone has a Happy New Year, and stays tuned for whatever I'm up to in 2023!
For a number of years I thought it'd be fun to gradually assemble a pirate costume that I can wear every year for Halloween. This eliminates the need for new costumes, and with a small amount of effort I can add little details to the costume every year. Last year (2021) I went very simple, repurposing a "Where's Waldo" striped shirt for my pirate garb and sporting a matching red bandana. This year, I decided I'd have a go at making a nice pirate hat.
I ordered a felted wool hat blank from Cooperstown Trading Post, in a size XL. I forgot to take a photo of the hat when it arrived, but it's a very basic black hat with a round wide brim. The hat was incredibly stiff, but with some persuasion, it became pliable enough to shape.
I wanted to style the hat similar to the classic tricorn, so I started by bending up the brim of the hat on each side and applied some small clamps to establish a crease. I used the steam setting on my clothes iron to gently steam the hat so that the crease would set. This worked incredibly well to soften the wool and make this work much easier. At the same time, I was able to steam the crown of the hat and stretch it over my head to achieve a better fit. With the hat shaped with steam and clamps, I used some thick thread to "pin" the sides up to hold the tricorn shape.
For the trim, I wanted something ornate but not too over the top. I found a wonderful trim from Palladia Passementerie which I think has the perfect level of flair. I sewed this around the brim of the hat after shaping it, using a thumb tack to poke through the thick wool and then sewing the trim into place.
I have some future plans to add to the hat, for example some feathers and maybe decorative pins or buttons, but at this point it was ready for the debut! It fits really comfortably over my bandana and I'm sure will hold up well for quite a long time!